%%HTML
<link rel="stylesheet" type="text/css" href="https://raw.githubusercontent.com/malkaguillot/Foundations-in-Data-Science-and-Machine-Learning/refs/heads/main/docs/utils/custom.css">
<link rel="stylesheet" type="text/css" href="../utils/custom.css">
Overview of the class
Introduction: Who are we?
| Invited Lecturer | Invited Lecturer | Teaching assistant | Lecturer |
|---|---|---|---|
| Yuchen Huang | Agathe Denis | Nicolas Marissiaux | Malka Guillot |
 |
 |
 |
 |
| yuchen.huang@uliege.be | agathe.denis@sciencespo.fr | nicolas.marissiaux@uliege.be | mguillot@uliege.be |
Bât. N1 Economie (bureau 33a)
rue Louvrex 14
4000 Liège
Belgique
About me
- PhD in economics from the Paris School of Economics
- Postdoc at ETH Zürich
- Associate professor at the University of Liège, Belgium
- Interested in public economics questions: inequality and taxation
- Using the standard econometric toolbox + natural language processing + machine learning
Who are you?
Where have you done your bachelor ?
Major ?
Programming experience?
A specific interest in: a method / a theme?
Class objective
The class focuses concepts & skills related to the management of data, that are central for the exploitation of data.
Goals:
- Equip you with the standard datascience toolkit.
- Put it to work on a real-world project.
Backbone of the class
- The
skills :- Data manipulation:
- Cleaning, Pipelines, data structure
- Data vizualisation
- Data modelling
- Data manipulation:
- The
tools :- shel
- python
- git
- The
concepts :- Project management: documenting, sharing & managing code
- Reproducibility
- The
methods :- Machine Learning
- Natural Language Processing
Public targeted:
What this course is, and is not
- It is:
Applied and oriented towards practice;General overview of different techniques - what they are and how to use them.Data analysis in general, not restricted to a research or a field (economics, political science).- In python.
- It is not:
Computer science . We’re not coding up models from scratch.Mathematical statistics . We’re not deriving the functions by hand.
Example project
A research question in history... where data are central
- Timing of the development of certain economic sectors?
- Geographical distribution of the firms?
- Interaction with public policies ?


Example: REFLEX project
Approach: The Swiss Commercial Registry (1883-)

Methods:
- Transforming the pdf into structured data using:
- google vision
- Open AI
- deep learning
- Transforming the pdf into structured data using:
Example: REFLEX project
- Objectives:
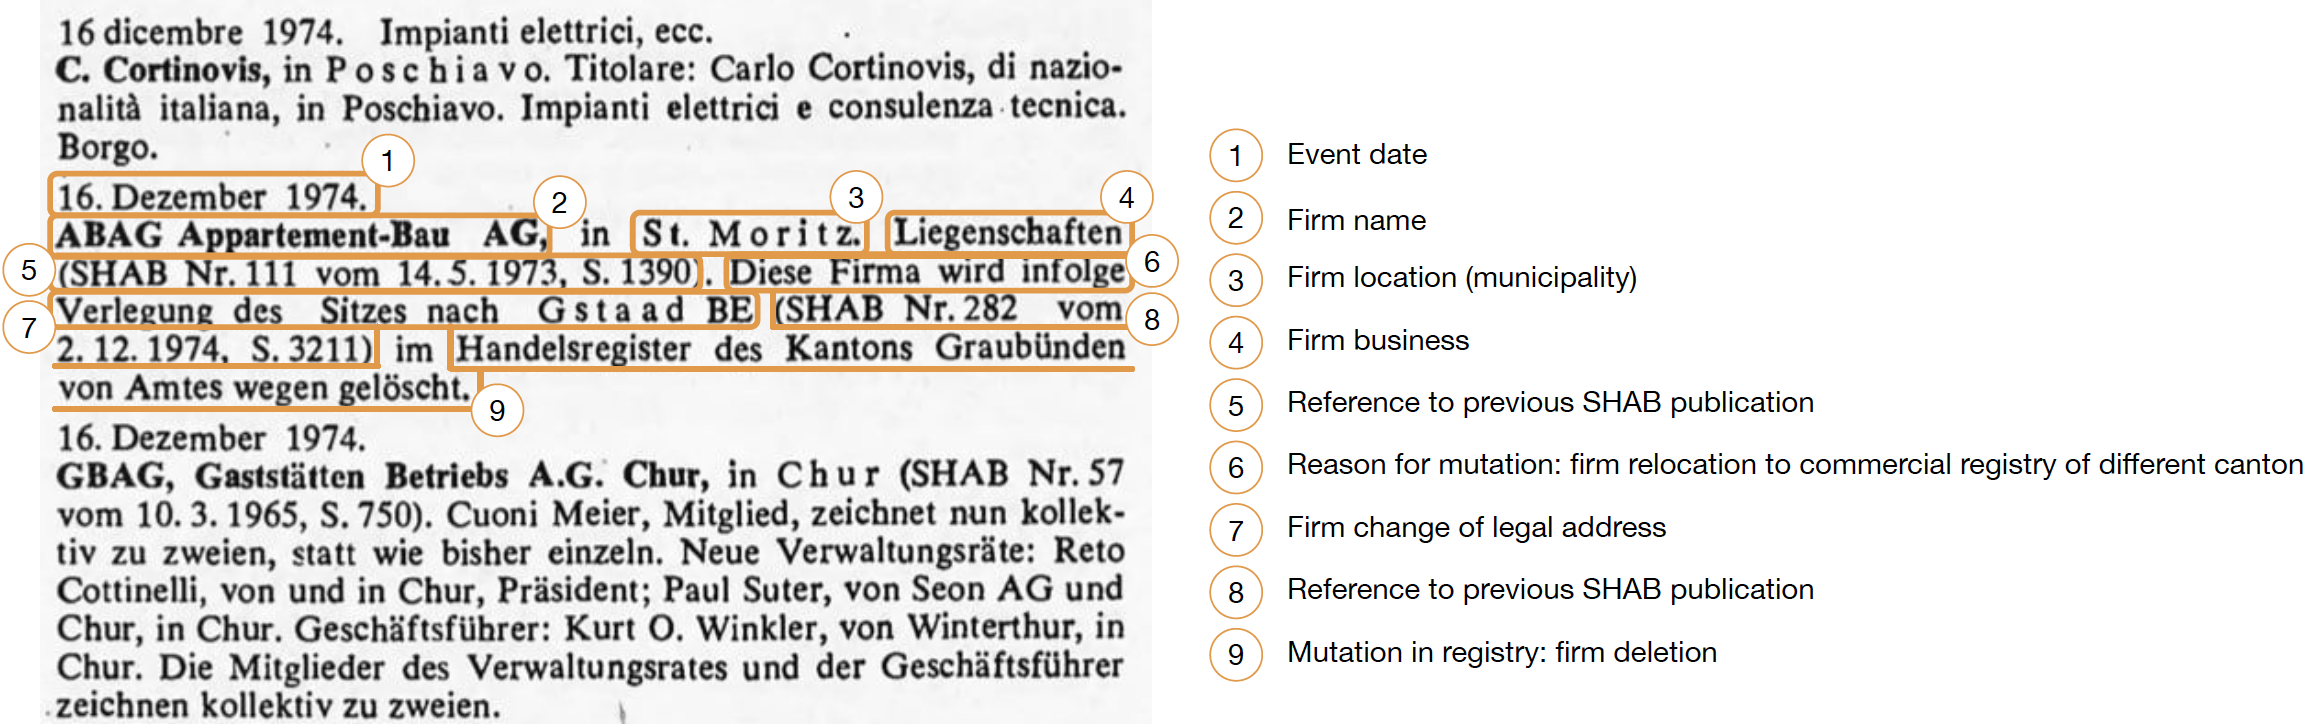
- Challenges:
- Correcting for OCR mistakes
- Building a firm identifyer
- 3 languages
- ...
Course organisation & logistics
How does the class work? Spirit
Sessions are designed to be interactive
- mix of live concepts & coding exercises
- I want to get you comfortable usings your computing environment to solve problems
- bring your laptop!
- I expect you have completed the installation guide and have all software installed.
- ask questions!
Homeworks
The homeworks are simple exercises designed to help you to “get your hands in the data & code”.
Should be given back as jupyter notebooks on lola.
Before handing in the notebook, you should restart your kernel and run it from the beginning to the end.
[Course project] Objectives
The
basics :End-to-end data project using
PythonFrom collection to modelling through visualisation
Should answer an open-question with data
Group project (2 people; 3 of odd no. of students)
Use what you learn in this course to
solve a non-trivial real-world question/problem using a data analysisDeepen one aspect of the course:- Three dimensions must be present in the project:
- data retrieval, visualisation or modelling;
- To a greater or lesser extent depending on the project.
- One dimension must go further than the others
- Three dimensions must be present in the project:
Shell
Command line interfaces (CLIs) vs. Graphic User Interfaces (GUIs)
CLI
- Faster if you know commands
- More precise
- Do everything in one place and don’t change windows
- Multiple steps can be chained and automated to become one
GUI
- Faster for beginners
- Less need to memorize
- Use an interface that is designed specifically for your task
- No potential for automation or command chaining
Navigation in the shell
- Present working directory (
pwd)- Display your working directory
- Use
cdto navigate to different directoriescd ..to go up one directory
- Use
lsto list directories mkdirto create a new directorytouchto create a new filermto remove a filermdirto remove a directorycpto copy a file
Windows Users
- There are 2 shells:
- Powershell
- Windows Command Prompt
- You can use either one, but Powershell is more powerful and has more features (and has the same commands as the Mac/Linux shell)
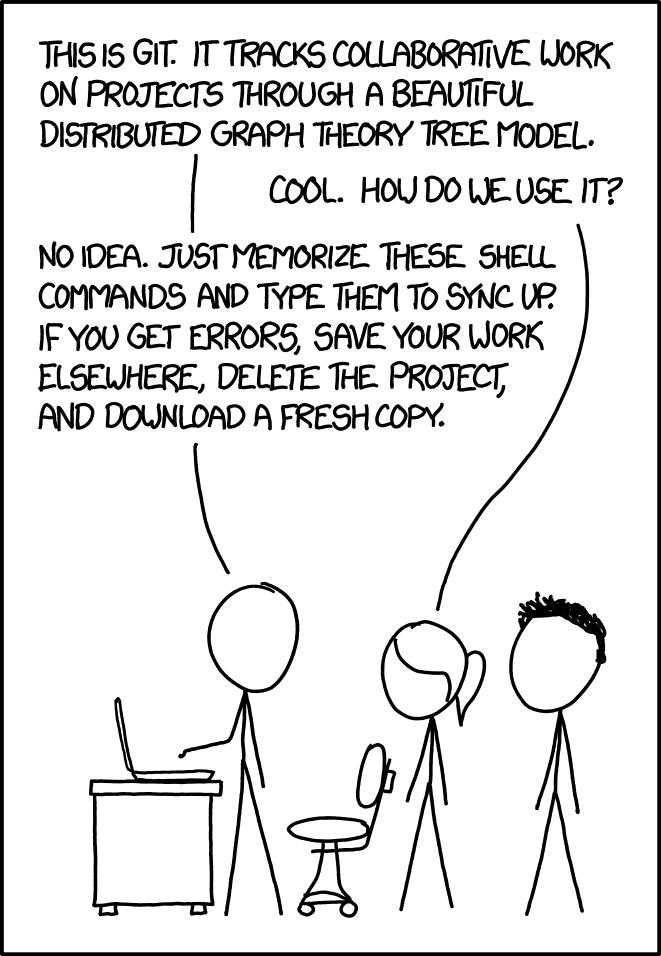
Git
What is git?
Definition: A version control system
Enables
Provides an organized
$\Rightarrow$ key tool from our
$\Rightarrow$ widely used in a companies / not enough in research:
- Software development
- Scientific researcher
- Anything involving coding (even latex)
What is GitHub?
Definition: A web-based platform for version control and collaboration (using git)
- Practical: Something that lets you:
- host your code online
- share your code with others
- collaborate with others on the same project
- keep track of changes made by different people
- manage issues and pull requests
We (researchers, dataanalysts, developers) need git and GitHub
- Most papers/projects are written by groups
- Empirical and computational projects become more complex
- The publication process entails multiple rounds of revisions
- Reproducibility and transparency are key
Learning git
- Learning git is a long journey
- Payoffs are enormous and once you learned it you will not want to go back!
- The best way to learn it is:
- Learn git on your local computer first
- Only use the shell!
- Practice, practice, practice!
- Don’t be afraid of an ugly and convoluted commit history, we won’t deduct anything for that
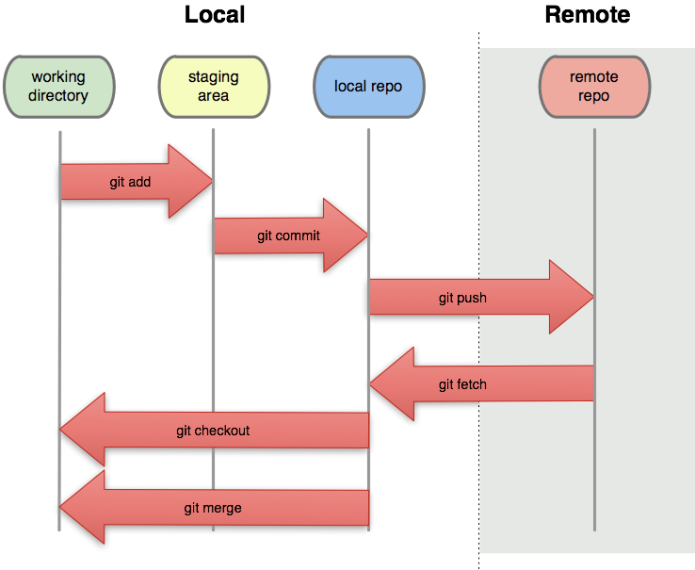
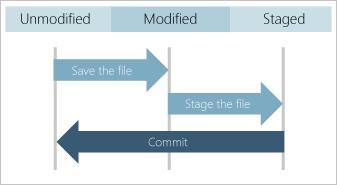
Git model
- You do work in your
working directory - Then you add it to your
staging area - Once you've staged all you changes for one discrete task,
commit a snapshot of the staging area - If you have a remote repository,
push your commit
Getting started with git
Setup GitHub account
- Navigate to GitHub's homepage + "Sign Up"
- Go through the account setting steps ("Verify your email address"...)
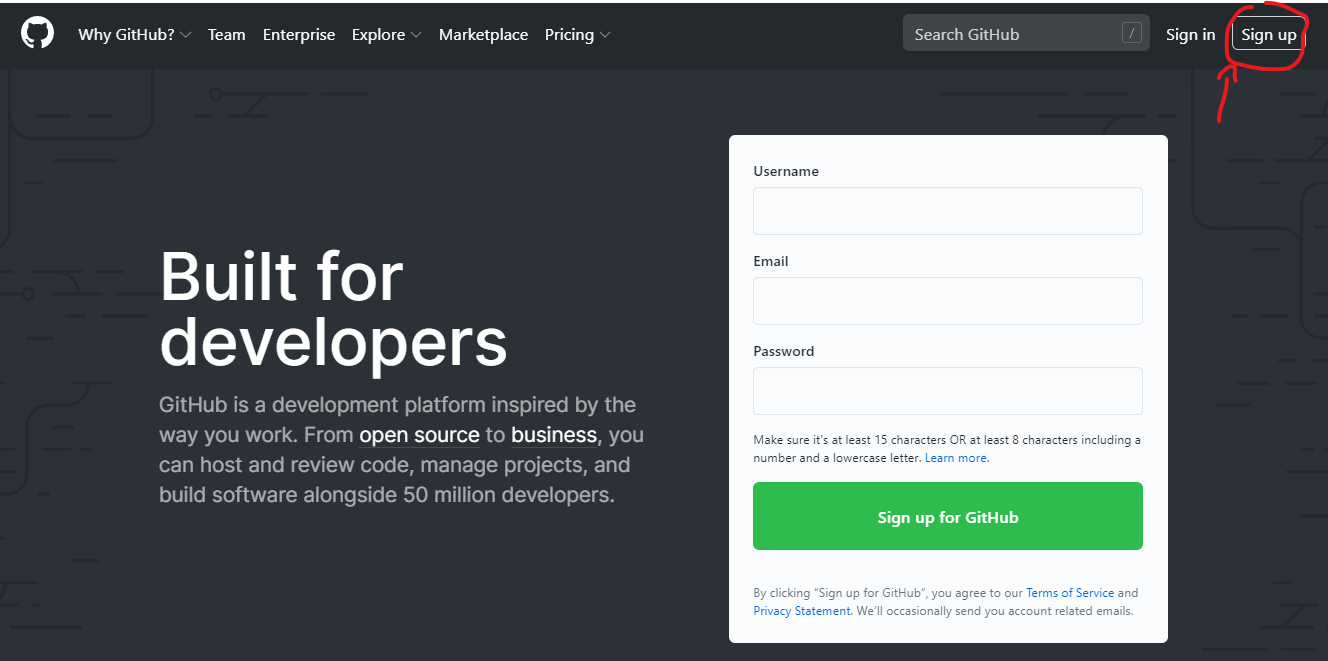
Navigate to GitHub's homepage. Navigate to "Sign Up" in the top right hand side of the page.
Getting started with Git(Hub)
Install Git (Linux, Mac, Windows) if not already installed
Git comes with a command line interface (powerful!).
You might want to add a graphical interface to make things easier:
- GitHub desktop
- You can link it with your GitHub account
- Or use the one from VSCode
[Hint] What actually is the Git repository?
- The Git local repository is associated with a particular directory
- Open the directory in your Git interface to see your options
- Git stores all its workings in that directory in a hidden subfolder called “.git”
3 special options:
README.md.gitignore : what should be ignored by the tracking systellicence $\rightarrow$ open source?
[Hint] What should I include?
At a minimum:
- Code (.do, .py, .R, .m, .jl, and so on)
- Text files (.txt)
- LATEX documents (.tex)
I also recommend:
- Raw .csv datasets, if small (<10 MB)
These are binary files, so you can’t see differences between versions. I recommend including them anyway.
- PDF files
- Word, Excel, PowerPoint files
Some people also include all datasets.
- Note that GitHub doesn’t allow files larger than 100 MB, or projects with total size larger than 1 GB.
For datasets, look into Git Large File Storage.
[Hint] What should I exclude?
In order to avoid driving your collaborators crazy, you must tell Git to ignore the junk files using a file called .gitignore. It looks like this:
- Junk created by LaTeX: $\textrm{*.synctex.gz, *.out *.log }$
- Junk created by Python: $\textrm{*.pyc}$
Best practice: use .gitignore to explicitly exclude everything that you don’t want to include, and commit .gitignore like any other regular file.
GitHub maintains a list of standard .gitignore files for many common languages.
From zero to git
The lifecycle of files
- Save:
ctrl+S - Add:
git add <filename>orgit add .(all files)- You can see the staged files with
git status
- You can see the staged files with
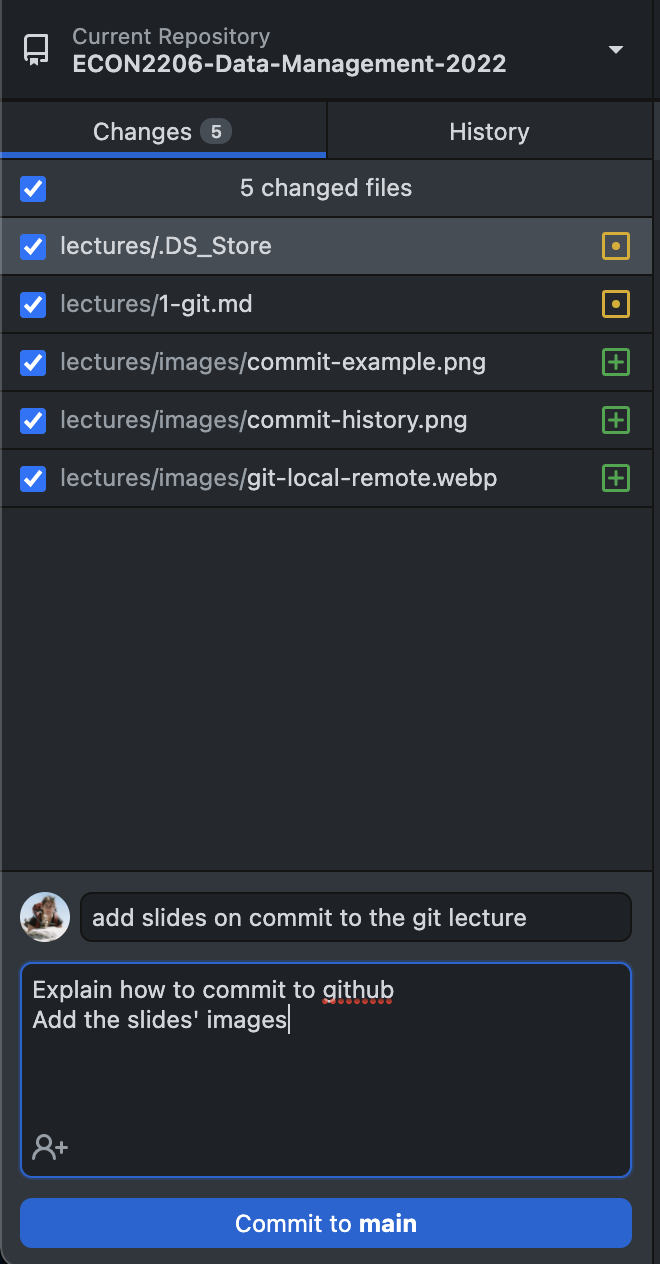
- Commit:
git commit -m "message"
Commits: saving a snapshot
"One discrete task" = a collection of changes, across multiple files (or not), that does one thing.
Examples:
- Change the formatting of a variable from string to numeric, and treat it properly across multiple scripts
- Change your regression specification in code, in the output, and in your paper and supporting documentation
- Add a new function
Before you commit
- Your code should run properly $\rightarrow$ run tests
- No compilation erros (in Latex for example)
- Output should be consistent inside the commit (including comments)
But it’s better to have frequent commits (that might have small mistakes) than to have giant, infrequent commits.
Checking the status of your repository (in the shell)
git status
Viewing changes when committing
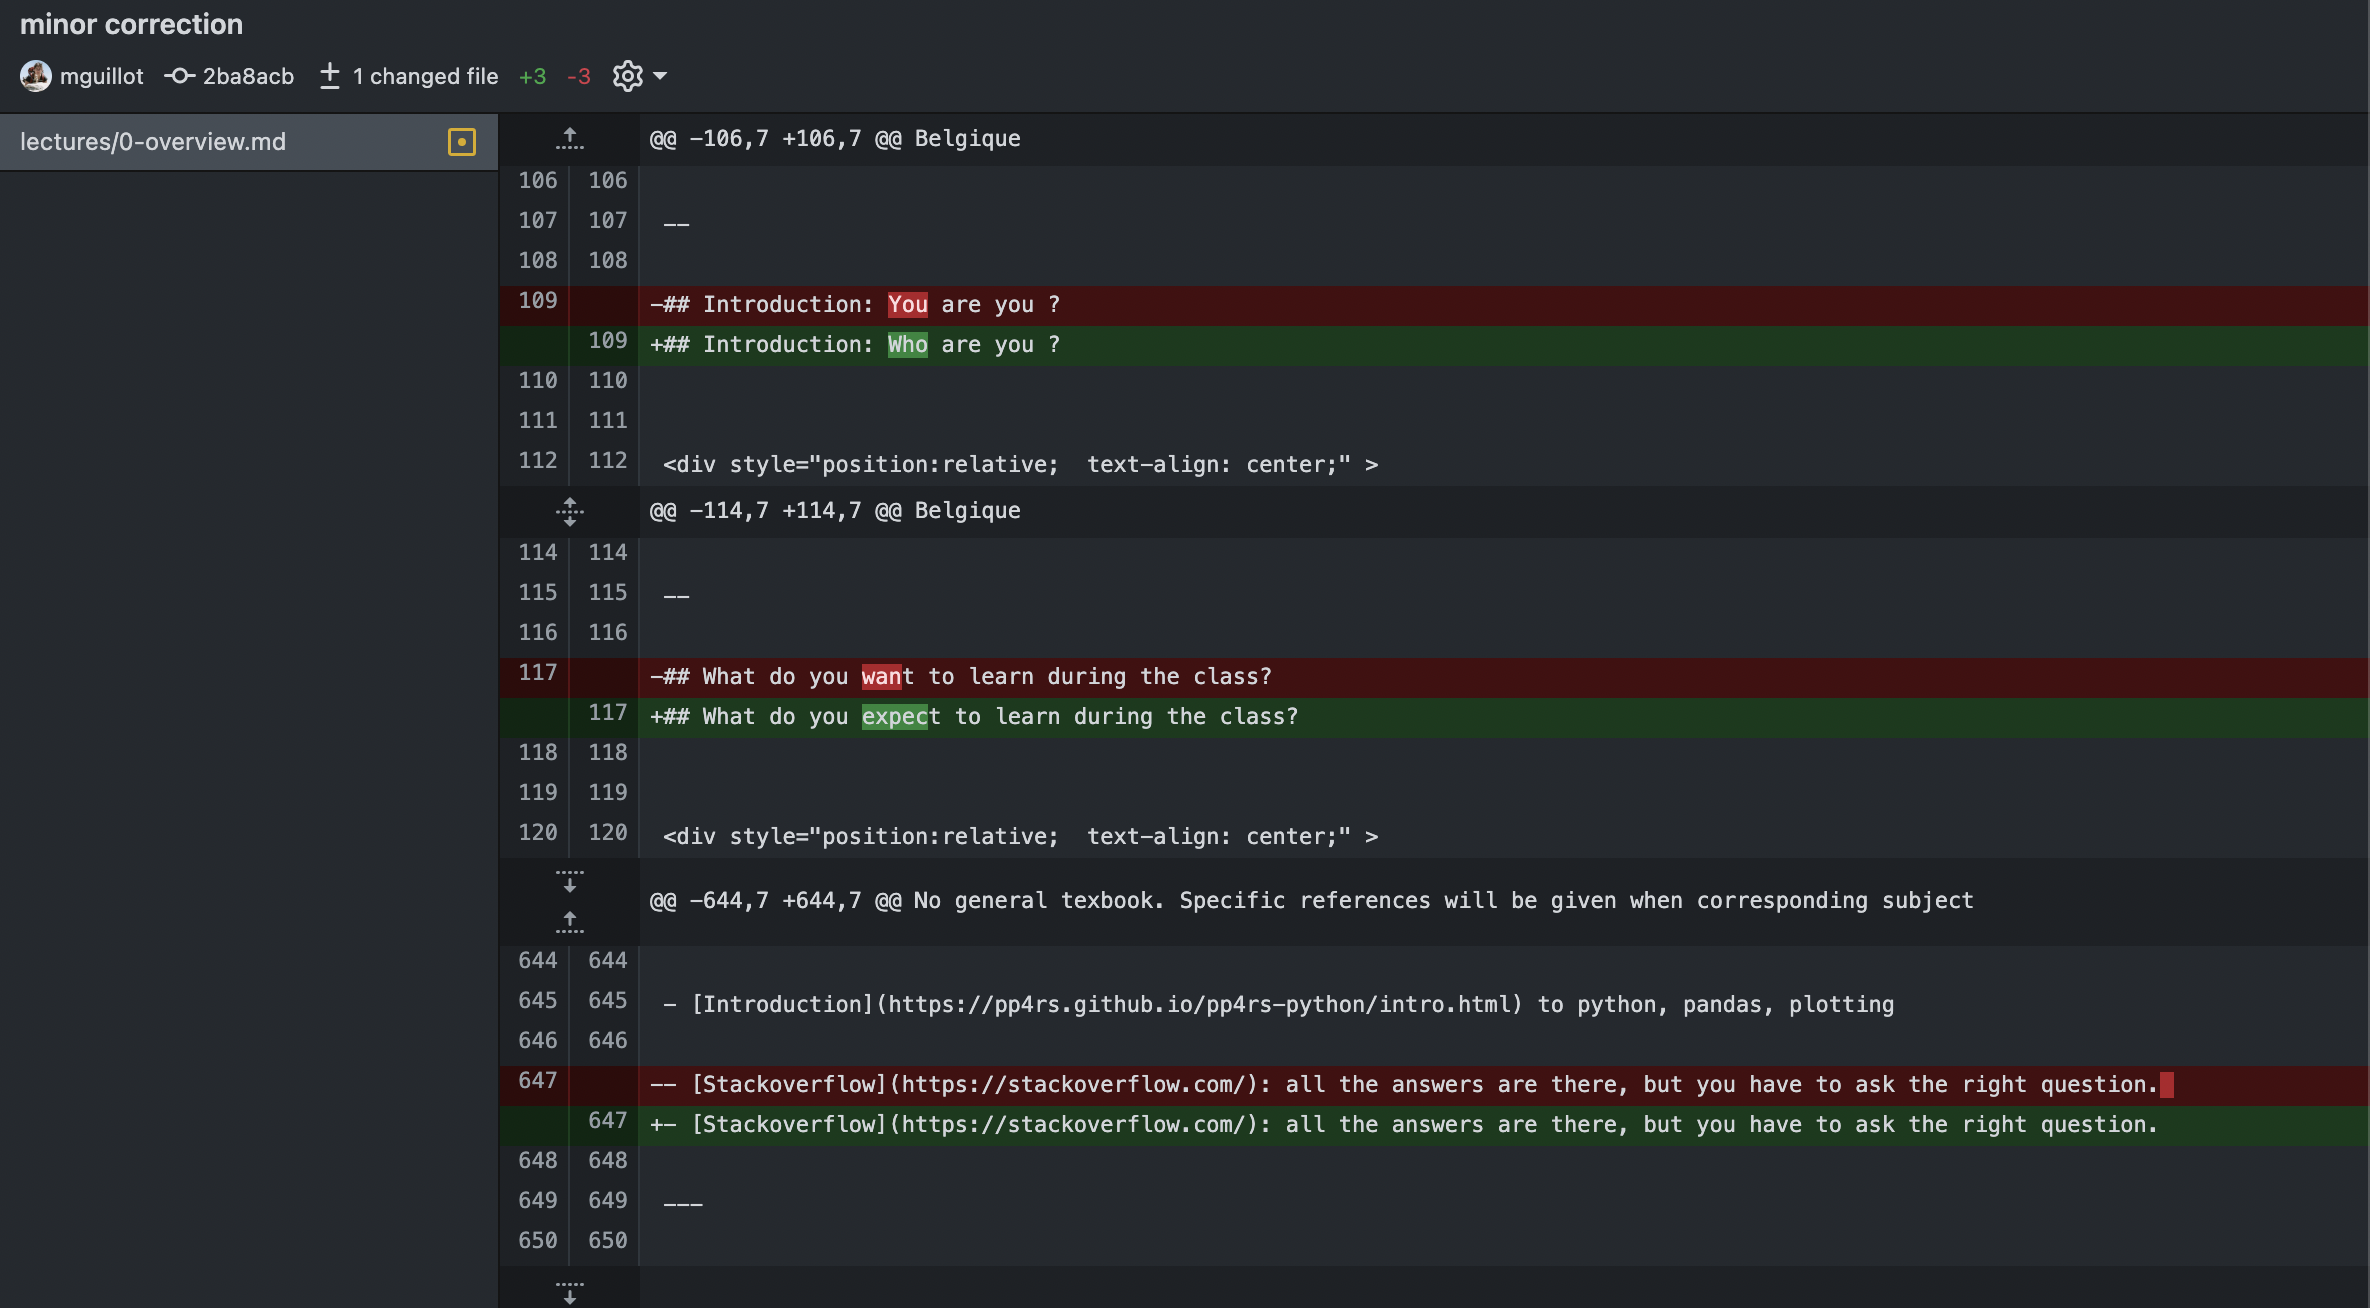
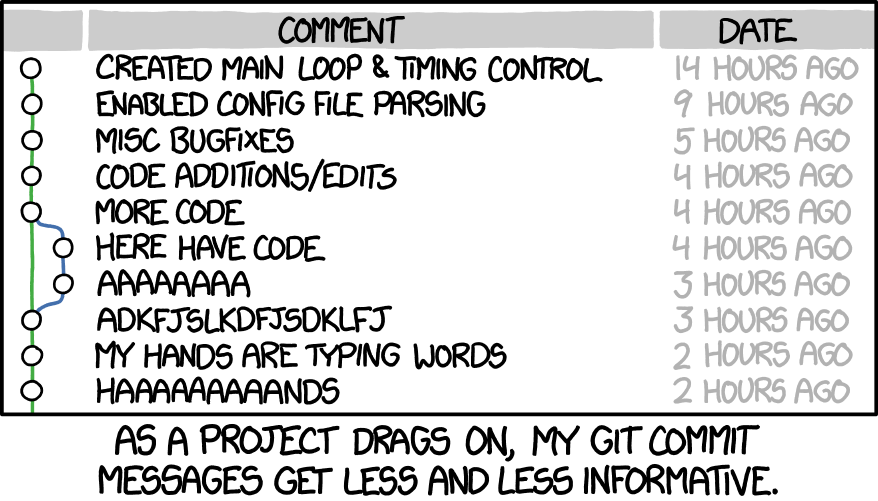
Commit message
Examples:
- “Change the formatting of start date variable from string to date format”
- “Add year dummies to regression specification”
→ The more detail, the more your future self will thank you.
git commit -m "Add slide on the commit git lecture"
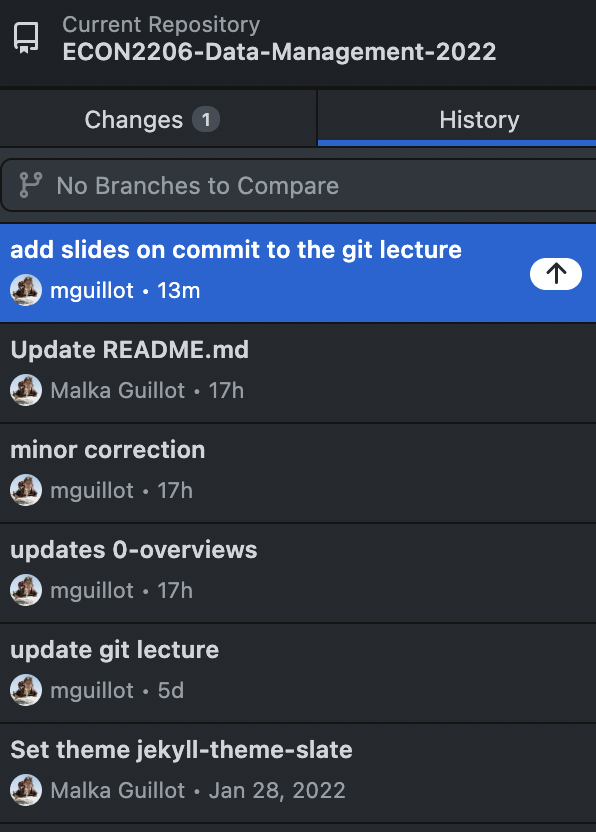
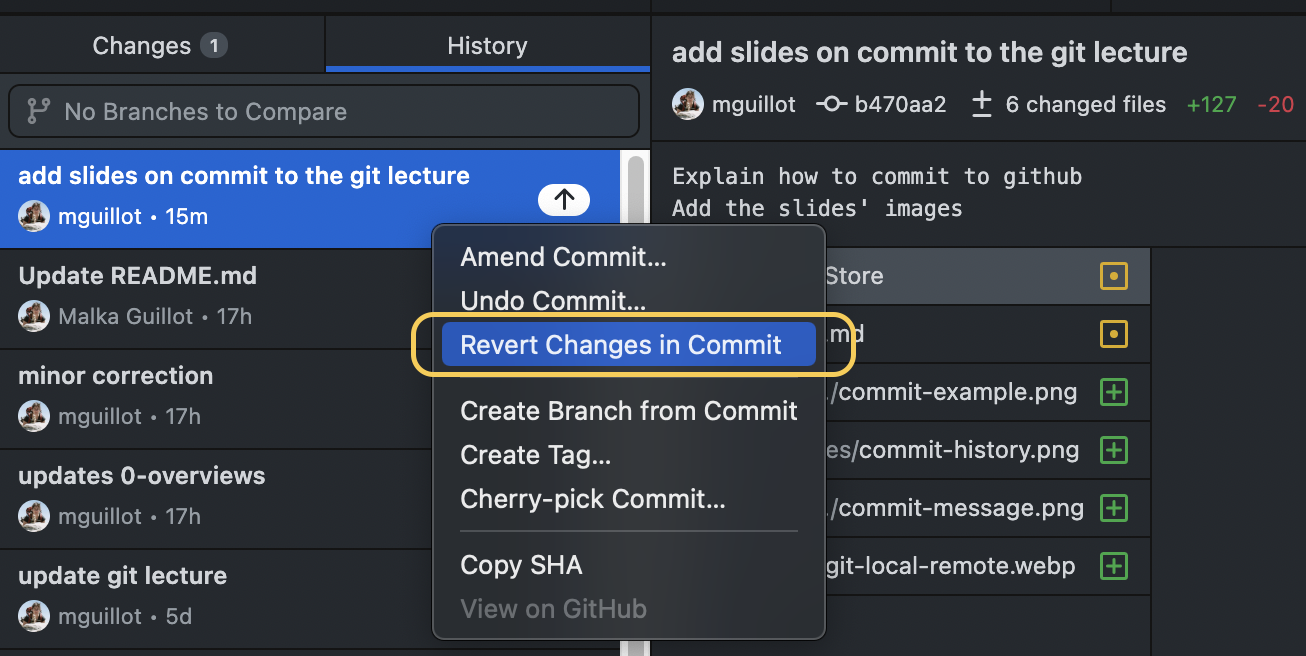
Viewing commit history
Much more to learn on git & GitHub
- Branches
- Merging
- Solvign conflicts
- Pull requests
- Collaboration
- Issues
Branches: trying things out
Branches are the most powerful part of Git
By default, all the work you do goes into the “main” branch
Want to experiment? Start a new branch
- You can switch between branches, and make commits to either branch
If your experiment works out, commit and merge back into the master branch
- If there are conflicts between the commits you’ve made on the two branches, Git will ask you to resolve them
- This is easiest with a graphical interface like GitKraken
- Only works with binary files
- If your experiment doesn’t work out, delete the new branch painlessly
From Git to GitHub
Collaborating: interacting with the remote directory
The remote repository is on a server, and holds a record of your commits and branches
You push to the remote repository to save all your commits
- You pull from the remote repository to load all new commits
- Always commit before pushing or pulling
- If what you’re doing is an experiment, make a new branch to avoid any trouble for your coauthor
- If there are conflicts between your commits and your colleagues’s commits, Git will ask you to resolve them
Basic workflow: push - pull
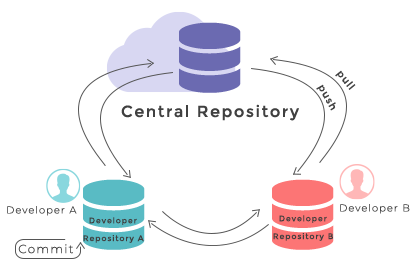
This is what happens between your computer (local) and your repository (remote).
git push origin <branch_name>
git pull origin <branch_name>
Pushing to the remote repository (GitHub Desktop)
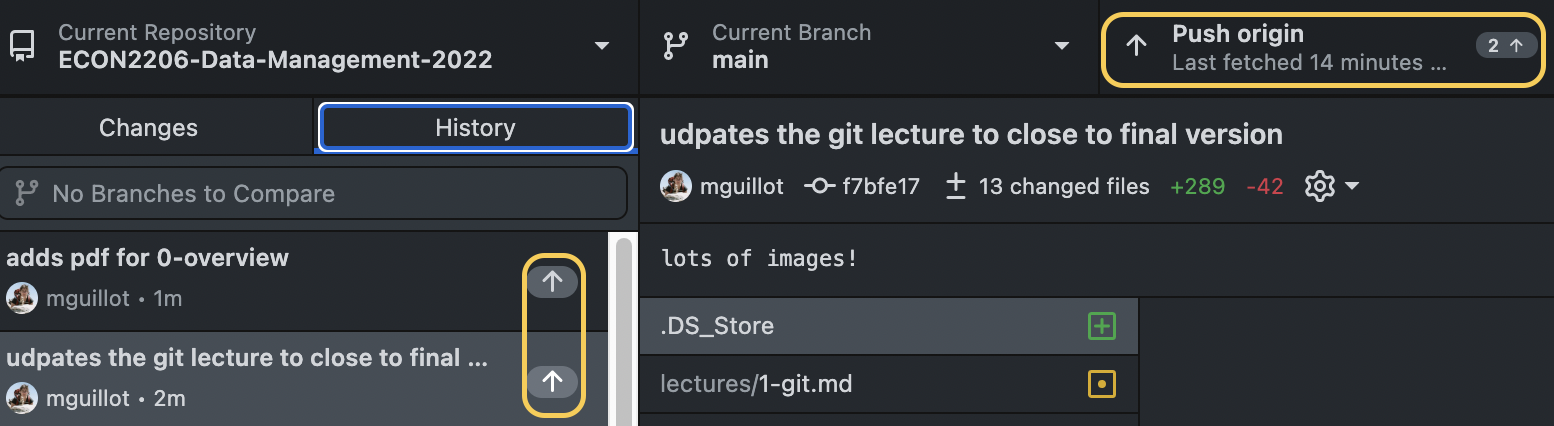
git push origin <branch_name>
Sending my commits to the internet!
The README.md
- Very important file!
- Objective: communicate important information about your project
- A markdown file
- Markdown?= lightweight markup language
Not only useful for README: for eg., these slides are written in markdown!
Getting Started with Python in VS Code + Jupyter
What you need beforehand
- Python 3.8+ (official installer or Anaconda/Miniconda)
- VS Code (latest stable version) – download from https://code.visualstudio.com/
- Internet connection (for the first extension install)
✅ Verify Python is on your PATH
python --version
# → 3.11.2   (example)
Install the required extensions
Extensions you must add
| Extension | ID | Why you need it |
|---|---|---|
| Python | ms-python.python | Core language support, linting, IntelliSense |
| Jupyter | ms-toolsai.jupyter | Notebook UI, cell execution, kernels |
| Pylance (optional) | ms-python.vscode-pylance | Faster type checking & autocompletion |
How to install
- Open VS Code → Extensions (
Ctrl+Shift+X) - Search the IDs above → Install
- Reload VS Code when prompted
(You can also run code --install-extension ms-python.python from a terminal.)
One‑click notebook creation
- Command Palette →
Python: Create New Blank Jupyter Notebook(Ctrl+Shift+P) - Choose a kernel (usually the Python interpreter you installed)
- A new file
Untitled.ipynbopens with a single empty cell
# Example: hello world
print("Hello, VS Code + Jupyter!")
Press Shift+Enter to run the cell → output appears below.
Notebook UI basics
Cells & toolbar
| Symbol | Action |
|---|---|
▶️ Run Cell (Shift+Enter) |
Execute current cell and move to next |
⏹️ Stop (Esc) |
Interrupt kernel |
➕ Add Cell (A / B) |
Insert above (A) or below (B) |
🗑️ Delete Cell (DD) |
Delete selected cell |
🔄 Restart Kernel (Ctrl+.) |
Restart the Python process |
Tip: Hover over any button to see the shortcut. You can also press
?in a cell to view the cheat‑sheet.